"The job of the artist is always to deepen the mystery" - Francis Bacon


Freelance Makeup Artist shooting for the stars...

Sunday, 14 April 2013

40's movie star mumma


I don't know anyone who loves old movies more than my mum, so today I decided to transform her into a glamorous actress, right out of the 1940's.

I have done the 1950's Hollywood glamour look, and from researching into the makeup of the earlier  decades of the twentieth century, many techniques/styles are pretty similar. One of the main distinctions between them though, are the hair styles, so for this look a added a quick updo to differentiate it.

I started by applying primer and Nars foundation all over the face, adding light Collection 2000 concealer to highlight (an amazing cheap concealer - highly recommend!) and blending before setting with Mac pressed powder. I then contoured the cheekbones, temples and hairline with Nars Laguna bronzer before adding Bourjois blusher in "Frosted Rose" and blended all with my large powder brush.

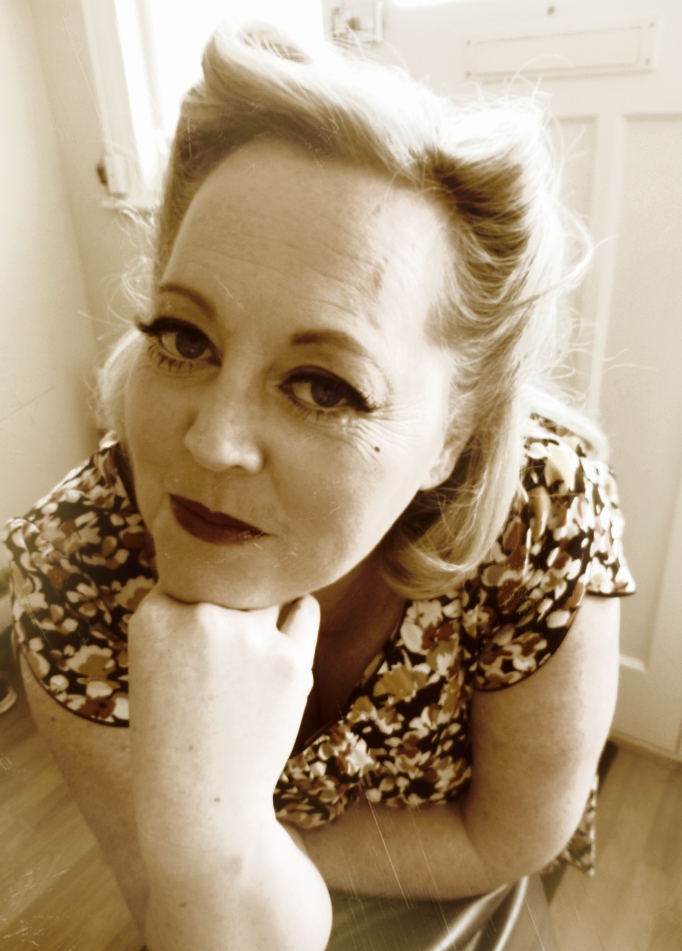


I used a light brown shadow to fill in and darken the brows and then added a similar shade to the outer corners of the eye. One of the main characteristics of this look is the back winged eyeliner so I added this with my Maybelline gel liner. I then added some black eyeshadow over this to darken further and get as close to the lash line as possible. I added a very light shadow underneath the brows and in the inner corner of the eyes. I lined the bottom waterline with white pencil and coated the lashes in lots of mascara. My mum has SUCH lovely long lashes so at first I didn't put any false lashes on, but to add that final touch of glamour, I decided to add these also. I finished the makeup with some rich red lipstick and a beauty spot.


For the hair, ideally I would have used a couple of rollers but I don't have any so I had to improvise and backcomb to add volume and then take two front sections and roll from the ends up, pinning to hold in place. I simply curled under the back hair and used some hairspray to keep in place.

This look really suits my mum and I thought she looked beautiful. I have a feeling I will be doing this again soon for her next evening out!

Thanks for letting me experiment on your face mumma! x

Tuesday, 9 April 2013

Paint, powder and rock 'n' roll


After joking about how my swirly black pattern ended up looking a bit like a face tattoo, I realised I hadn't considered trying out a "rocky" look (as in a fan of rock music, not Sylvester Stallone, may save that for another time though). I had done a couple of quite detailed makeup looks over the weekend so I decided this would be an ideal Sunday evening experiment that hopefully, wasn't too tricky...

For this I googled the standard "goth"/ "emo"/ "rock" images for inspiration and there are some really awesome styles out there. I'm hoping to try a really gothic look soon but chose to keep it relatively simple for my first trial and see how it went!

I used my lightest concealer as my foundation as this typical look is very pale skin with mostly black eyes and dark lips. I set this with a pale powder and used a slightly darker one to contour lightly where I would usually and blended with a large powder brush.

I then used black liquid eye liner to shape and fill in my brows. I made these longer and thicker than I would usually just to make them more drastic and gothic looking. I neatened the edges with a small blender brush and concealer. I then applied black khol liner to both the bottom and top waterlines and created a drastic flick on the outer corners with liquid eye liner. I took the tip of these flicks and drew a line diagonally across my lid right into the inner corner before filling in the resulting triangular shape completely in black. I extended the line down towards the bridge of my nose and then took the liquid eye liner underneath my eye, again extending the inner line down towards my nose, parallel to the line above (being careful to leave a slight gap between the two). I added two more smaller flicks on the outer corners and set it with black eye shadow. I added some metallic silver eye shadow to the inner corners and lightly above the thick liner and blended with a fluffy brush. I then applied plenty of very black mascara and added a pair of short thick false lashes too.

For the lips I used some face paint as I didn't quite have the right shade of lipstick. I mixed red and black for a burgundy colour, lining my lips with this and then mixing a lighter colour to fill in the rest before adding some purple tinted lip gloss.

I decided that to finish the look, I would try and add a couple of piercings - or rather, some paint to create what looked like piercings! For this I dotted two very small black circles to the left above my lip and then in the middle underneath my lips on my chin. I then added a small white/grey dot over (half) the top of the black dots to look like a silver stud with a shadow. To give them more of a realistic look, I used a darker concealer to paint a slight semi-circle around the dots and smudge a little to make it look as though my skin was slightly raised where the piercings are.

This was a really cool look and I was pretty ready to hit a gig of some sort once done. Perhaps I should make the piercings a permanent feature...what do you reckon!? :P

Thanks for reading! ♡


Sunday, 7 April 2013

More movie makeup...


I couldn't help but recreate this movie look at some point, it's so recognisable and having looked online, extremely popular with others doing the same. I tried to avoid doing it very early on just as I feared it was too predictable, but I decided today that I would just go for it. So here is my copy of The Swan Queen in Black Swan...

I started with a white base all over the face and neck onto the ears and into the hairline (I'm getting a little tired of my paint as it requires several layers in order to get a flawless look, by which point I can not move my face at all!) and then sketched on the winged eye makeup with a black khol liner. I copied the famous portrait of Natalie Portman for this, ensuring that it looked as similar as possible, going just up to and onto the brows and out towards my hairline. I then filled this all in with black paint.

Whilst this dried, I mixed red and black to create the plum lip colour. I painted this on to my lips, neatening up the edges with white paint before adding a touch of white onto the centre of my bottom lip and finishing off with a deep plum gloss.

I went back to the eyes which were now dry and neatened the edges/lines with more of the white paint and my super fine brush. I then swept on some white lines over my lids, in the inner corners and to the outer parts of each eye, creating the feathered look iconic to this character. Natalie has much stronger cheekbones than I do so I added some light grey eye shadow to emphasise mine with a fluffy brush and blended with a large powder brush.


I just wished I had the red contact lenses to really finish the look off! Another accessory to add to the list to get methinks...


Saturday, 6 April 2013

So, I got a face tattoo...


Though I love recreating well-known characters and makeup looks from various eras etc, I've been wanting to try a few different things recently, looking more at generic patterns and textures and how you can apply them to the face. I've got quite a few in mind that I want to try and this was the first...

There really isn't too much to tell on this one re how I did it as it was mainly just me freehand with black face paint and my super fine brush...If I doodle I tend to draw eyes, hearts and these sorts of swirly flowery vine-like things (all the manly stuff) so it made sense to stick to what I knew best to start with!

I began by applying foundation and light concealer under my eyes, down the nose and in the area between my brows and blending together. I used "tease" from my Urban Decay "Naked 2 " palette and a fluffy blender brush to contour more drastically than I would usually on my cheekbones, down the side of my nose and around my hairline/temples. I then brushed this from the crease of my eye up, into my brows and then into the inner corners to the sides of the top of my nose. I left my lips nude and my eyes plain so that the focus would remain on the pattern (hence why I feel naked/look like a boy in this!)...

I then began painting the various vines down, curling them at the end. I built these up, adding more flicks, swirls and thickness, until I was happy with it. I took some pictures and decided that it would probably look better if I took the black right into my hairline and onto my scalp. This meant that the pattern blended into my face more and made it look almost like a tattoo.


I can't wait to try some more! Watch this space...


Monday, 1 April 2013

Clowning around...


And so, back to the gritty stuff! It's freaky but the gruesome looks are just so much more fun to do!

I'm pretty scared (like many) of clowns so I thought I would face my fears with this one. It was going to go either way - kill or cure - I'm still not a fan, but it's the longest I've ever looked at a clown so I think I'm on my way to not minding them so much. Needless to say, I won't be setting this as my screensaver any time soon..!

Again, I had done some research online to get some inspiration for this one. I liked (well, you know what I mean) the sharp teeth seen on Stephen King's iconic "It" clown so decided to mimic these. The stereotypical vertical lines down the centre of each eye are seen on clown and mime makeup and I just think it's super creepy. To add even more intensity I decided to add circles around my eyes and smudge onto the brow line to give a scary heavy brow and just a small red nose so that I didn't look quite as approachable as the child-friendly clowns you see with huge bulbous noses.

I started with a white base, covering the lids, lips and brows. I then used a black khol eyeliner to sketch the mouth, using my own upper and lower jaw as a guide. I then drew on the pointy teeth and the verticle lines above and below each eye before drawing on the circles, by following the natural hollows of my eyes.

I used some red and black to paint a small circle on the tip of my nose and then painted in the outlines of my (new) mouth to create the lips. I then used a fine brush to go over the sketched lines of the teeth and fill in the gaps inbetween. I thickened the lines around the eyes, adding extra black paint over my brows and taking it up slightly on the outer parts to give that snarly look and also added little diamond shapes under each vertical line on my cheeks. I used a liquid liner to line my lash lines to darken further. I then mixed some grey to shade around the eyes and used a sponge to blot this and make it look a bit more messy and textured. I finished it off by neatening the teeth with white paint and a fine brush and added a few light crease lines at the very corners of my mouth with a dark grey.


This is probably the scariest look I have done yet and I had so much fun doing it. Must order some fake blood next - I may have to think about issuing a parental guidance certificate for my blog soon!!

Anyone fancy a trip to the circus?? (:


Sunday, 31 March 2013

I can do "normal" too sometimes | Weekend wear...


I've been spooking everyone out recently with my weird creations so I decided to do something a little more "generic" and write a quick post about my evening makeup from Friday night (yes, I do wear "normal" makeup too!) I tend to always do some form of smoky eye and because this was a friends birthday and we were heading out in Ã¼ber tanned, rhinestone sprinkled Essex, I paired some super dark eyes with some red lips. One of my biggest rules is to either go big on eyes OR on lips, never both, but for an ultra glam night out (particuarly in Essex!) I made an exception...

Currently I'm using L'oreal's new illuminating primer and Nars sheer glow foundation. I applied the primer before my foundation using a beauty blender which is my new favourite makeup bag addition! I have the Cosmopolitan one which you can pick up in Boots or Superdrug and I would strongly recommend picking one up. You can stipple your foundation on which means no brush strokes and it's great for covering blemishes gently and it just gives a flawless look.

I then apply some creamy concealer from Nars underneath my eyes and down the side of my nose to create a kind of triangle shape and blend this in. I cover any blemishes with this also and set it all with a loose powder. The concealer I have is quite light so acts a bit of a highlighter on the highest part of my cheeks under my eyes. To contour (add shape and definition) I use Laguna bronzer by Nars underneath my cheekbones from my ear to close to my mouth and around my hairline, down the sides of my nose and underneath my jawbone. I then add some sleek blusher to the apples of my cheeks and blend everything with a large soft brush (I love the Real Techniques large powder brush).

The base is now done so I then comb my brows and use a dark brown powder to define them, neatening and evening up both and giving a nice arched shape with a slanted liner brush. Using a small blender brush and some MAC concealer, I neaten up the edges of my brows and add more highlighting to underneath the arch.

I then move on to my eyes and cover the lids with a neutral natural eye shadow and then line my eyes with a black khol pencil. I take this right into the waterline and then blend. My favourite palettes at the moment are "Naked 2" by Urban Decay and Stila "In the light". Folding a cotton pad in half and placing underneath my lower lash (to prevent fall out), I dab on some Ebony from my Stila palette, right along the top and bottom lash lines. I make this slightly thicker on the outside corners of my eyes, taking it out to a wing and then into the crease of my eye about a third of the way along. I then take "busted" from the Naked 2 palette and blend the edges of the black, taking this over the entire lid up to the crease and also the outer bottom lash line. I take "gilded" from the Stila palette and dab it lightly onto the very centre of my lids to add a little gold shimmer and use "bootycall" from Naked 2 in the inner corners and under the arch of the brow. Taking a fluffy blender brush I blend all of this together.

I finish off my eyes with lots of L'oreal telescopic mascara in black, some black liquid liner to add extra definition on my lash line and some Katy Perry false lashes. To neaten up any edges, I use a cotton bud with some makeup remover and concealer on a brush as I did with the brows. To complete the look I used Revlon Colorburst lip gloss in "Fire" which gives a gorgeous rich colour and stays on without drying out your lips.

Now - back to the gruesome sadistic makeup...


Saturday, 30 March 2013

What are you staring at?


I wasn't sure what look to do this weekend so I ended up improvising a bit! I was swaying more towards recreating one of Tim Burton's characters just because I love everything that he does and his films always look so atmospheric and fantastical. Edward Scissorhands was one of my favourite films when I was a child and I'm keen to trial the look but want to get some latex first to really do it justice (*note to self to order some today).


I had then started looking at some of the Sally from "A Nightmare Before Christmas" makeup looks online which, being another Tim Burton masterpiece, is a brilliant look to try and mimic. I decided I would save this for when I had a little more time and just do a similar spooky doll-like look. It turned out that I got a little carried away and could have just done the Sally look after all, but I like to think this was inspired by it anyway!

I had seen a few different takes of the "creepy doll" online (one example above) and also used some of these techniques for the look. I took different traits from the various executions to make my own one and this was the outcome. It's a really creepy look so I had fun jumping out at my family!

I started by applying a base of white paint (after moisturising/priming) all over my face to the hairline and down my neck. This paint (Grimas) is good but it doesn't go on very evenly and can actually dry too quickly. It's very reasonably priced so is great for the money but I think I'm going to invest in a more expensive brand soon (any recommendations welcome!). I then added even more white to completely cover my eyebrows so I could draw on some new, higher ones to give that exaggerated, non-human quality. I sketched these brows on with a khol black eyeliner and also sketched the outline of the lips (similar to those seen on the Queen of Heart in Burton's "Alice in Wonderland" above) and the stitches coming from them up towards the ear (seen on Sally in "A Nightmare Before Christmas" also above). I did this horizontally across the base of my neck and also followed the natural hollows under my eyes to create the new lower lash line. This is a great way of enlarging your eyes which is perfect for creating that staring doll-like effect.

I went over these sketched lines with a fine brush and some black paint and added some baby pink blushes to my cheeks. I painted my lips (the area drawn out) with a deep red and added some contouring to my cheeks with a very light grey. I then drew on some lashes to the new lower lash line drawn and then dotted on some freckles. To finish the look I stuck on some super-sized false lashes to both the top and new bottom lower lash lines and tied my hair into high bunches (flashback to being 6!)

I was amazed at how such simple effects like these can completely change your face and was freaked out by how much this didn't look like me when I looked in the mirror. I will definitely be using these techniques in more looks going forward and will be experimenting with new ones... so many possibilities!

(Caption: Jade was curious about how her blind date would go and hoped that she hadn't put too much blush on...)

Wednesday, 27 March 2013

It's no joke..


So, yesterday I officially "launched" Jade Louise Makeup blog on Facebook and Twitter and I've been so overwhelmed by all of the lovely comments and by the number of people spreading the word that I couldn't help but try a new creation this evening to share. I was so hyped by the positivity, that I quite literally decided to paint a smile on my face...

Okay...so it doesn't quite scream "I'm the happiest girl alive", but I've had this in my mind to recreate for ages now and decided today was the day!

This look is so simple yet so effective. I used just three colours to achieve it.

The other great thing about this is that it's meant to look imperfect and undefined so its incredibly hard to go wrong. The more bedraggled it comes out, the better!

I threw on the white base with a large brush, leaving space around the eyes and some lines on the forehead. I then went straight to the black and followed the natural hollows of my eyes, taking the top line right up to and slightly over the brows. To get that intense black look I use my trusty MAC "smoulder" eye khol pencil and went along my waterline and right into the inner corners of the eye. I used my finer brush to blur and rough the outer edges of the circles and drag a few fine lines above the brow, to the nose and out towards the side of my face to give the creased, running makeup look that is seen on Heath.

I used this same technique on other areas of my face such as the lines from the nose to the mouth and on my philtrum (that's one for the pub quiz!) which I then blotted with a damp sponge to blur and blend in to look more natural and give grey tones for texture. I added the dark red to my top and bottom lip - though hardly any on the top lip - and took the brush line up at a 45 degree angle to the tops of my cheekbones. I then used the same blotting/sponging technique to blur and smudge this in, taking it down onto my chin to look like it has been smudged by being rubbed.

To finish this I continued to blot and smudge everything, defining the lines with some more bright white and grey to provide a more 3D effect.

There are a lot of interpretations of this "Joker" look online and I can see why. It's amazingly quick and effective and it really spooked me out looking at it! So here is my take on this incredible makeup to pay homage to this epic film and absolutely awesome actor, Heath Ledger...RIP x


Tuesday, 26 March 2013

Dot to dot to dot to dot...


My latest makeup experiment was inspired by the widely renowned artist Roy Lichtenstein. I had seen a number of interpretations online and loved how different it was. The look is achieved by the repetitive application of primary colour dots all over the face with thick black lines to create the shadows. I hadn't done anything like this before and was excited by a different challenge.


I particularly loved the sculpture "Head with blue shadow" created in 1965 (above on the right) as it had even more colour than the typical iconic one colour images seen (above on the left).

I started with a white painted base and sketched on where the shadows would sit with a black khol eyeliner. because the eyebrows are quite high, I painted heavily over my own brows to blend them into my skin and draw on the others higher up. Once I was happy with the outlines, I used a cotton bud to dip into red face paint and began adding the dots to the left of my face and then did the same to the right of my face with blue face paint. I then filled in all of the shadows with black face paint, using a fine brush to keep the lines very neat to give that cartoon-like effect. I used a white eyeliner on my waterline and to white-out my lashes. I finished the look with bright red bottom lip and white to highlight and some thick false eyelashes.

I really loved this look and thought that the outcome was great. I couldn't believe how effective it was with such a simple technique, though the eyelids were certainly the trickiest. Topped off with a bright yellow wig, this look would have fully embodied the pop art look!

Monday, 25 March 2013

It’s what’s underneath that counts…


So, after playing around with long false lashes and beauty spots, I decided it was time to go to the opposite end of the spectrum and get ugly… On the flip-side to loving Hollywood glamour, I also absolutely adore the gruesome, gory makeup in the movies, especially those seen in the legendary horrors way before CGI where makeup artists had to create special effects in original and incredibly skilful ways.


I’m not sure if anyone reading will have seen or heard of “The Horror Makeup Show” at Universal Studios in Florida, USA, but it is one of my favourite attractions there for this very reason. Not only is it immensely funny, but it shows the techniques of the movie pastime where make up artists had to deal with challenges that computers were not yet around to help overcome. Figures such as Jack Pierce and Lon Chaney who created the infamous characters of Dracula, The Mummy, Frankenstein and The Phantom of the Opera are exposed in the show, and for good reason of course. They are legends in makeup artistry history and hugely inspiring.

I started off small with a skeleton look that was influenced by a few different images and tutorials I found online, but my fascination with horror and gruesome makeup effects means this will certainly be a first of many. So watch this space!

For this, I used white Grimas face paint to cover my entire face. Using a black khol eyeliner pencil, I sketched the outline for the skull, using my own bone structure as a guide. After identifying which areas are to be blacked out, I used black face paint to fill them in. Once this was done, I used a fine brush to add in some additional details such as the teeth and shading to create a more 3D effect. I blurred some of the edges with a sponge whilst the paint was still wet to make the skull look less neat and more realistic/creepy and used grey to add more shading. I added some more black on my neck to create a quick spine/neck to complete the look.


BOO!! :)


Swinging 60's...


After recreating my 50’s look, I started to look into the statement makeup looks of other iconic eras. Another style that has always intrigued me and stood out is that of the 1960’s. It’s such a distinctive and instantly recognisable look that I couldn't help but try it out. As Twiggy was such a stand out figure of the decade, I based my drawn on lower lashes and super sized false lashes on images of her.


For this look the eyes are the hero feature, exaggerated with huge lashes and thick black liner in the crease of the eye and the lash line. I used a light foundation and powder for the base and a light pink blush for the cheeks. To achieve the black line in the crease of the eye I used my fine Grimas brush and black paint. I created a winged line on the lash line and brought to up at the end to meet the line from the crease. Using the same brush and paint, I drew the straight fine lines underneath my lower lashes to recreate the iconic 60’s bottom lashes, starting longer and getting shorter towards the inner corner of the eye.

Quite a few of the images I found had very light metallics/highlighters under the brow and in the inner corners of the eyes so I used a white shimmer shadow to replicate this. To achieve the colossal lashes, I used two pairs of false eyelashes - one finer and longer/winged pair and another thicker and shorter pair. I finished this look off with a quick beehive quiff and pale lips to keep the focus on the eyes and voila!..enter Austin Powers baby yeah!


50's Hollywood glamour...


I love anything to do with old Hollywood glamour and am mesmerised by the iconic actors and actresses of the 40’s and 50’s. I decided to recreate the high glamour of this era with the blood red lips, winged eyeliner and beauty spot. Dita von Teese is well known for channelling this beautiful look, so I used an image of her along with the iconic starlets to create this style of makeup.


I started by using a very pale foundation and powder to set to lighten my skin tone and recreate that porcelain look. I contoured using a slightly darker powder and very light concealer to emphasise the cheekbones and give that elegant, defined shape. I then used a black liquid eyeliner to shape and fill my brows and create the stereotypical winged liner over the top of the eyelid. I used a soft rose blusher on the apples of my cheeks and used red Grimas face paint to get the iconic bright red lips. By using paint and a fine brush I was able to create the perfect shape, highlighting the cupids bow and giving a deep rich colour. I used the superfine brush to also add the beauty spot with black paint I then added some fine but long false eyelashes to complete the look and add extra glamour.


Monday, 18 March 2013

"Hi, my name is Jade and I'm obsessed with makeup..."

For as long as I can remember I've been creative. Art was always my favourite subject at school and I would spend hours painting and sketching in my room as a teenager (crazy, rebellious adolescence, yes). Despite being complimented on my artistic efforts and gaining decent enough grades, unsurprisingly, I was encouraged down the academic route. So I packed my baked beans and hoodies and headed off to university for a degree in English and American studies.

Anyone who knows me knows that I love makeup and I find any excuse to experiment with it, making over my friends at any opportune moment. Now, at the ripe ol' age of 24 and with an ever-growing passion for makeup, I've decided to start sharing some of the looks I have done more recently, giving me even more of an excuse to get creative and push myself (it also means that the hours spent sitting on my bedroom floor with a plastic plate, palette and sponge, only to scrub my face red raw to remove my creations within 5 minutes of completion, aren't a complete waste of time).

I love anything and everything to do with Hollywood and the behind the scenes "tricks of the trade" so I'm particularly fascinated with theatrical makeup and how you can completely distort and alter a face. I love recreating the looks of past eras and iconic images, inspired by old and new techniques found on TV and in the movies.

So - I'm dedicating this blog to showcasing my makeup creations, how I do it and what inspires me. I haven't had any form of professional training so it's purely me testing and trialling with the tools I have, picking up the basics from some of the fantastic makeup artists that grace our computer screens via YouTube and social networking sites alike.

Here's to the hundreds of looks and tips I aim to share, and to the ones I hope to pick up on the way!

Thanks for reading!
JLMx