"The job of the artist is always to deepen the mystery" - Francis Bacon


Freelance Makeup Artist shooting for the stars...

Sunday 25 August 2013

Gomez glamour...


Selena Gomez is super gorgeous as we all know, and she looks even more gorgeous in her latest music video "Come and get it". So much so, that I decided to go right ahead and "get it" (makeup look) for myself!

I started with MAC Studio Sculpt foundation after priming my skin and used MAC pro longwear concealer to highlight, blending in well. I set this with a pressed powder and then contoured with Nars "Laguna" bronzer. Selena is pretty bronzed in this so I used more than I would normally. I used MAC blush in "Harmony" and mineralize skin finish in "Soft & Gentle" on my cheekbones, down my nose and just above my brow bone in the middle. Using a large powder brush I blended this all well. For my brows, I used B. eyeshadow in "Cocoa".


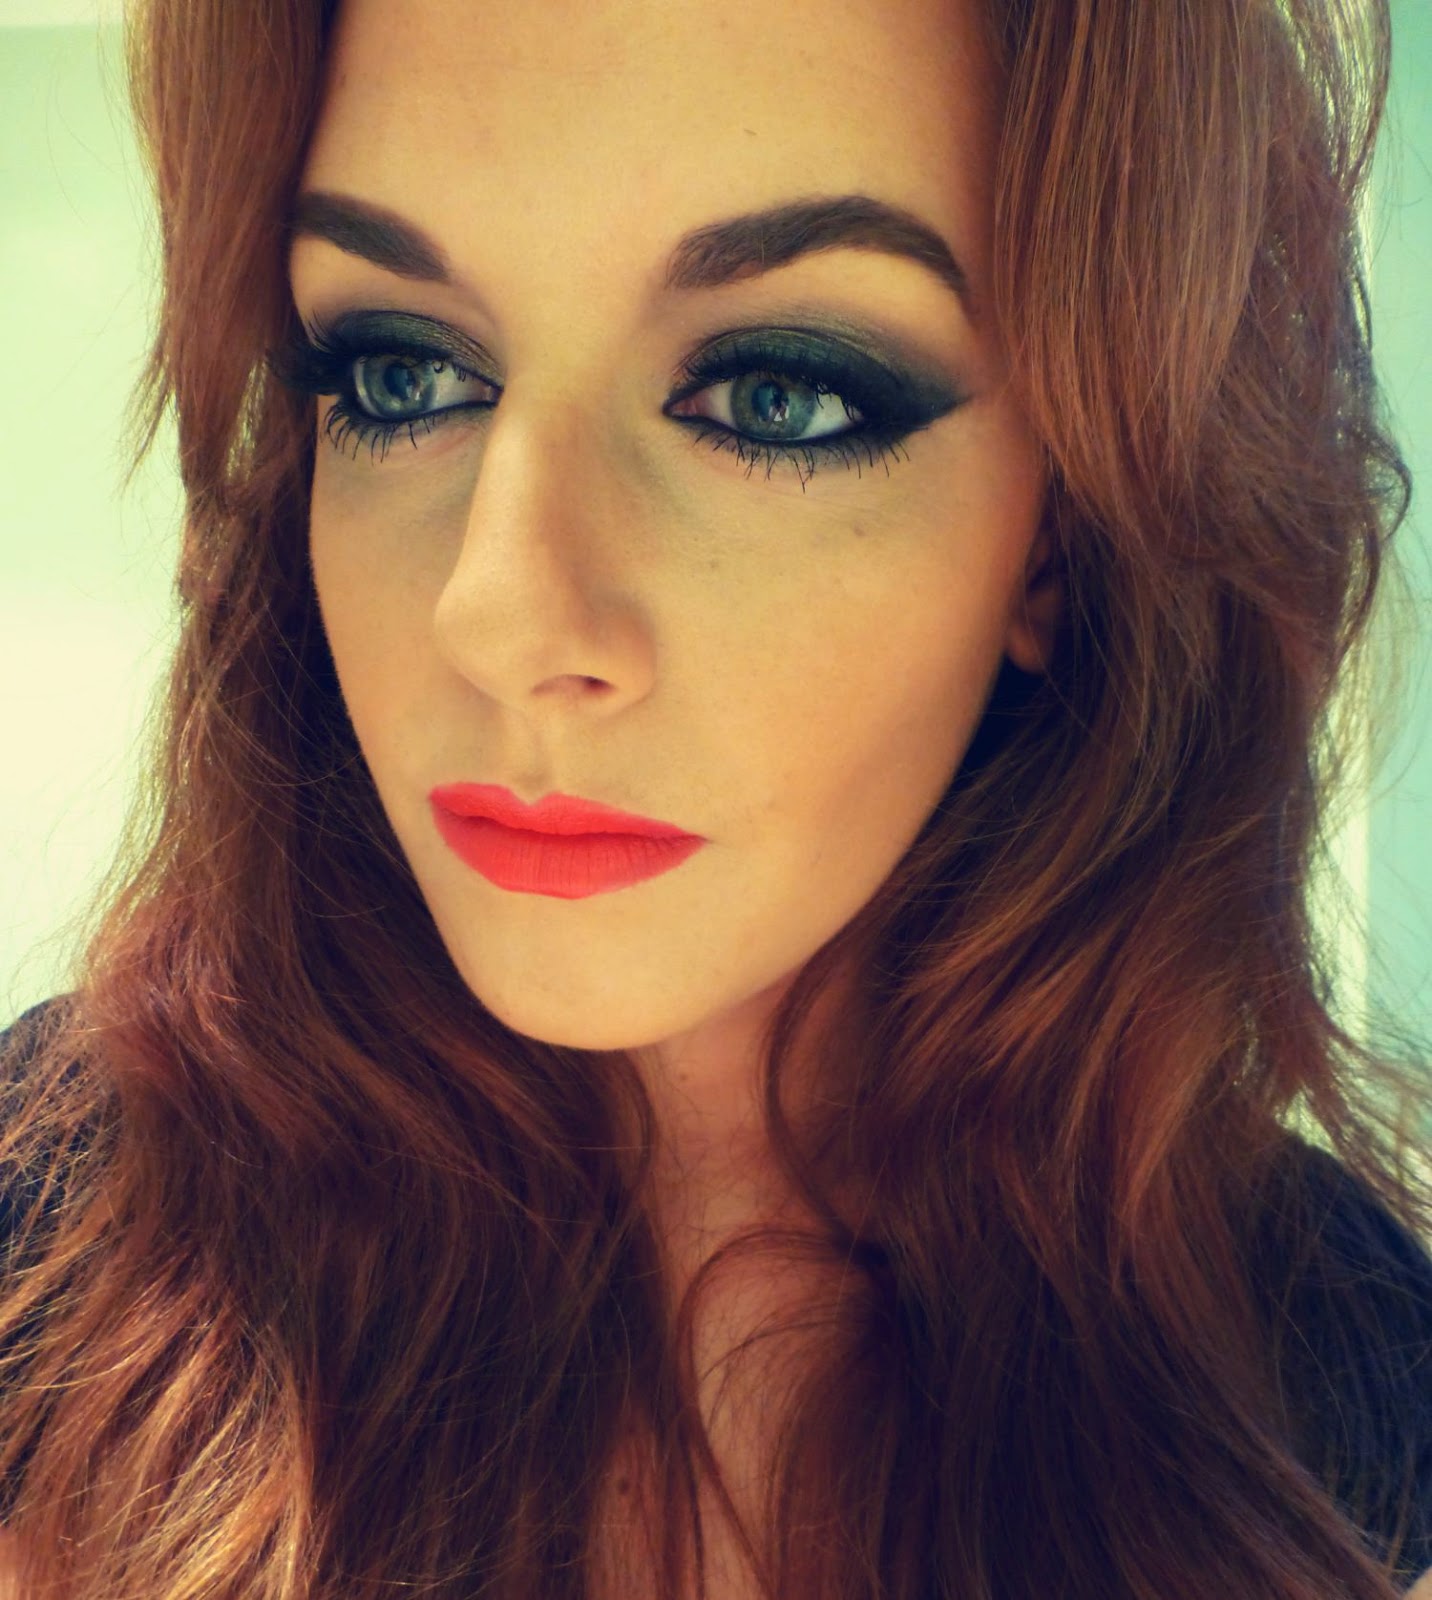
Selena's eyes in this are very dark, smoky and dramatic. I used my Urban Decay Naked 2 palette for this, starting with "Tease" in the crease of my eye and just slightly downwards at the start of my brows, after lining all of my eye with MAC khol eyeliner pencil in "Smoulder". I used "Suspect" all over the lid to give the silver shimmer and then "Blackout" along the lash line, in the outer corner crease, winging out at the edge. I then blended this well with a fluffy blending brush, blending underneath the lower lash line also. To neaten up the winged edge, I used liquid liner and concealer. I used "Foxy" under the brow and in the very inner corner of the eye to highlight.

To finish off, I layered on Maybelline "The mega plush" volum' express mascara and added Katy Perry false lashes in "Cool kitty". For the lips, I used red liner and Bourjois "Rouge Edition" lipstick.

Not quite Selena, but I love this look for an uber glamorous night out!

Thanks for reading (:
JLM x


Freud fraud


After creating my look last weekend influenced by cubism, I started looking into other art movements, styles and famous artists' work for inspiration. I remember looking into Lucian Freud when studying art at college and I loved his style of painting. He is known for using strong brush strokes and emphasising the various flesh tones of the human skin. I decided that this could be a really interesting look to try in makeup, hopefully transforming myself into a Freud style painting of myself. Here's how it came out...


In terms of how I did it, it was mostly improvisation and just using Freud's own self portrait for inspiration. I used a combination of water based face paints and various tones of concealer and foundation to mimic the style as best possible, building up until I was happy. It is a great way to look at portraying skin tones, we often think it is just beige or brown, but there are elements of all colours such as greens and blues that make up flesh tones - Freud uses all of these in his works.

I love looking at artists' styles for influencing makeup looks - art on canvass to art on the human body!

JLM x

Sunday 18 August 2013

All the right angles...


Good day guys!

I'm going super crazy with makeup looks this weekend and thought I'd share one of the designs I did yesterday, before continuing with more today (and they all pile up!) 


I've had some great feedback and response to this on Instagram so I decided I'd show you how I did a Cubism inspired look. Cubism for those of you who may not know (I'm sure you're all super clever and are fully clued up but just in case!) was an art movement in early 20th century and it's most famous pioneers were Pablo Picasso and Georges Braque. It is an abstract style using lots of angles, lines and shading, creating a fragmented, three-dimensional and overall, looks pretty darn cool (see above). I remember doing this at school and thought it would be interesting to see how you could use the natural angles/lines of the face to recreate this technique. 


The way I did it was fairly basic and didn't take very long at all - it was another look that used a simple technique but had a great outcome.

I used a brown eyeliner pencil to draw the lines, using the natural hollows and lines of the face - I think it is important to always try and work with the face, making the final look blend in and flow well. The main lines were down the cheekbones, along the jawbone, down the nose and along the brow (as with when you are contouring). I blended these out slightly by dragging my forefinger downwards along the line, creating a slight fadeout. I then used a dark brown eyeshadow to blend out further, followed by a lighter brown. I then used white paint on the other side of the lines to highlight, once again picking out many of the areas you would highlight in your everyday makeup. Again, I dragged these lines out to blend. And it was as simple as that really! 

Looking to do some more art inspired looks so watch this space!
Thanks for reading :)
JLM x


Sunday 11 August 2013

Respect your elders


Hey hey!

I've had this look in mind for a long time now but just hadn't got around to doing it, most probably because I was absolutely terrified by how I would look by the end of it! However, I finally caved and decided to face my fears and try this out today. So here it is, everybody, meet nanny Jade...

I used minimal products for this as the technique is predominantly based on adding shadows and highlighting to change the shape of the face and create the illusion of wrinkles/creases etc., so the only things I used were a very light concealer, a darker concealer, a clean foundation sponge and talc powder.

I saw a very clever technique online which I used mainly for my eyes - or rather "crows feet"! For this I used darker concealer and dabbed it around the outer corners of my eye and blended. Using the very light concealer, I smiled a super large smile and then dabbed this over the top. When you relax your face, the natural creases are still left dark and voila! you have yourself some wrinkles! I also did this same trick on my forehead and between my brows and lips. Once you have these natural wrinkles, you can use a fine brush to go over them again to emphasise them - the darker the colour, the deeper the wrinkles appear.

It is important to then blend this, avoiding overly cartoon-like wrinkles and to give a more natural look. I used a light brown/grey shadow to contour my cheeks and neck, making me look more drawn and thinner. I then continued to contour bags under my eyes and lines around my mouth.


I used talc powder on my brows and hair to look make it look grey and sat staring into the future. Scary stuff. If it's taught me anything - besides to moisturise more - it's to make the most of every day, I hate to sound like a 15 year old cheerleader, but you really do only live once...

Thanks for reading!
JLM x